Summary:
Remapping the new GL and GR back buttons on the Nintendo Switch 2 Pro Controller only takes a few taps, yet it can transform the way we play. By holding the HOME button, the console’s Quick Menu pops up, letting us assign any input to either rear button on the fly. Even better, the Switch 2 stores each player’s choices for every individual game, so our sprint in Splatoon 3 won’t overwrite our boost in Mario Kart World. This guide walks through the entire process—from the first time we press that shiny HOME button to advanced builds that shave frames off speed-runs. We’ll cover smart genre-specific layouts, tricks to dodge common errors, and the comfort benefits that back buttons offer for accessibility. Whether we’re veteran competitors or handheld commuters looking for extra convenience, mastering GL and GR gives us custom controls tailored to how we actually play. Let’s dive in and make those rear paddles work for us.
Meet the GL and GR Buttons: The Switch 2’s New Secret Weapons
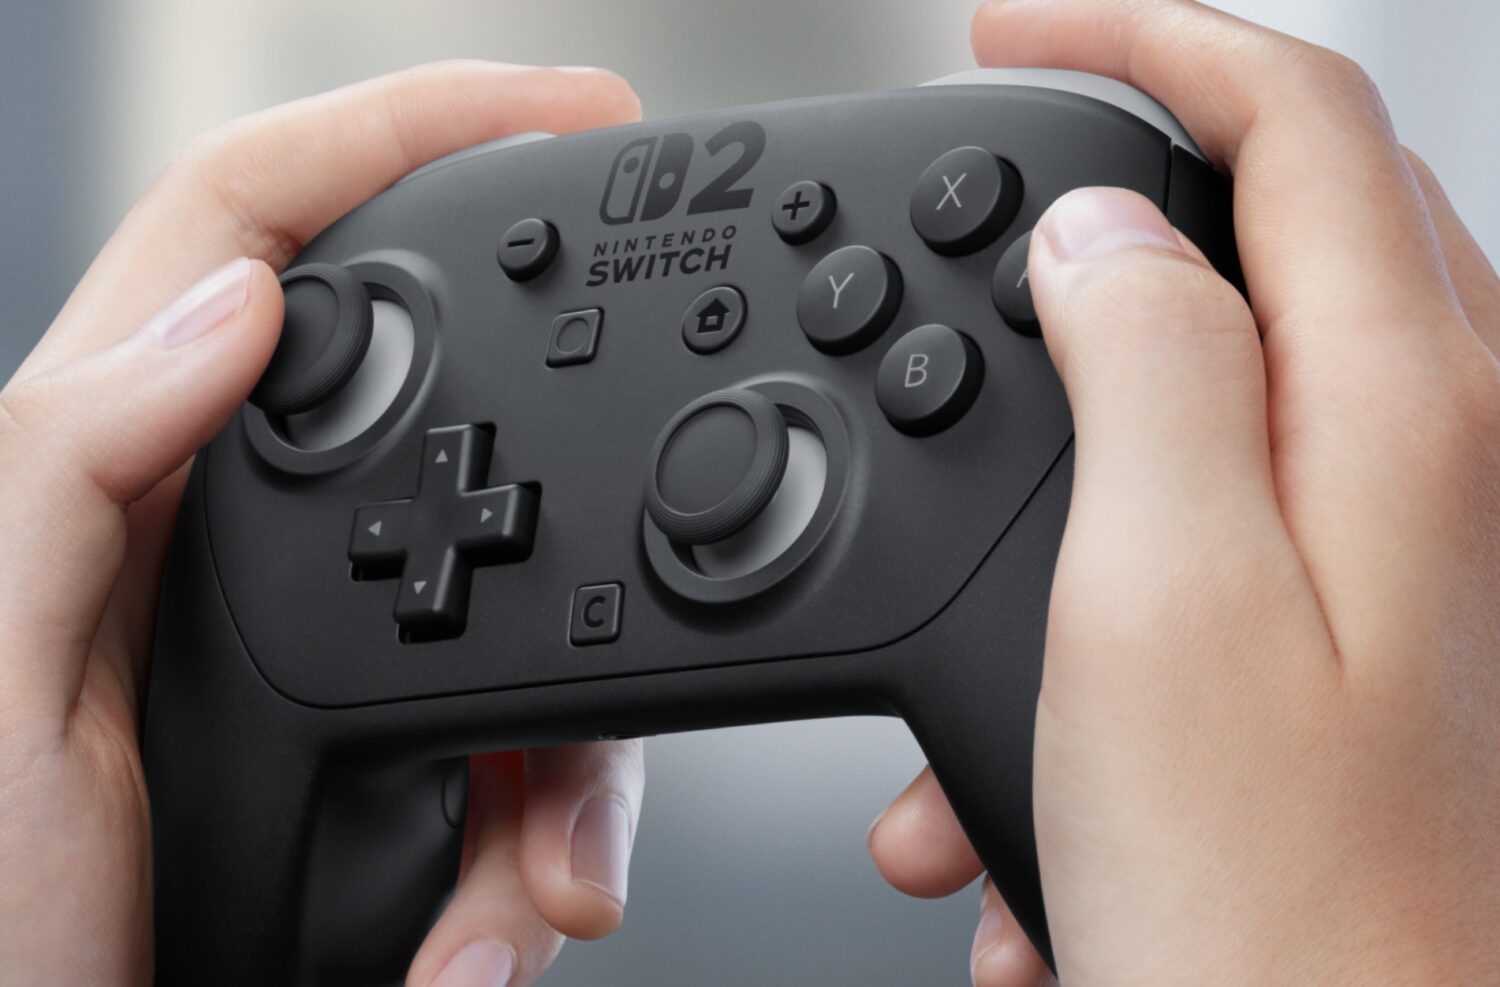
The Switch 2 Pro Controller adds two subtly curved paddles—GL on the left, GR on the right—nestled under our middle fingers. They sit where our grip naturally rests, ready to mirror any face-button, stick-click, or even a combo shortcut. Nintendo planted them here to save our thumbs from frantic stretches and to free up motion-aim users who never want to lift a digit from the right stick. If you’ve ever hacked an Elite or 8BitDo pad just to get rear buttons, you already know the muscle-memory gains on offer. For newcomers, think of GL and GR as programmable macros without the scary PC software; they’re built into the console OS itself. All it takes is one long HOME press to unlock them.
Opening the Quick Menu: Your Gateway to Instant Customization
While any game is running—yes, even during a boss cutscene—press and hold the HOME button for about a second. A translucent pane slides in from the right: the Quick Menu. Most folks glance here to tweak brightness or airplane mode, but buried at the bottom sits a new option labelled “GL/GR Buttons.” Tap it and the screen shifts to a clean diagram of the Pro Controller, those back paddles pulsing softly to invite us in. Nintendo kept the interface minimal: highlight GL or GR, press the physical button we want to bind, and watch a cheerful chime confirm success. No need to exit the software or reboot; the mapping applies the instant we back out of the menu.
Nintendo revealed you can customize the GL and GR buttons on the Switch 2 Pro Controller from the quick menu during a game.
The system will also remember each users button assignments for each
game they play. pic.twitter.com/QKu38Rkhvi— Stealth (@Stealth40k) May 14, 2025
Step-by-Step Mapping Walkthrough
Ready to set things up? Follow this rhythm:
- Hold HOME until the Quick Menu appears.
- Select “GL/GR Buttons.”
- Pick GL (left) or GR (right).
- Press the button you’d like to duplicate—A for jump, ZL for aim, anything goes.
- Hit “Done” and return to the game.
If both paddles need assignments, repeat for the second one. The whole routine takes less time than waiting for a level to load. Because the Pro Controller features digital inputs, latency remains identical to the original buttons, so competitive timing isn’t compromised.
Per-Game Profiles: Let the Console Do the Remembering
A hidden gem of the Switch 2 firmware is per-title recall. Once we set GL as crouch in Splatoon 3 DX, the console quietly tags that layout to our user profile and the game’s ID. Fire up Mario Kart World next, remap GL to item, and only that racer will wield the new setup. Jump back to Splatoon, and our crouch returns without a second thought. Each player profile maintains its own database, so siblings or roommates won’t overwrite one another. It’s controller peace at last.
The Competitive Edge: Why Back Buttons Matter More Than You Think
Milliseconds count in ranked lobbies. Transferring high-frequency actions to GL or GR keeps thumbs glued to thumbsticks, preserving aim fidelity while shooting or steering. Imagine bunny-hopping in Overwatch 2 without lifting the camera stick, or activating drift boosts in Mario Kart while still feathering acceleration. Rear buttons slash the travel time between commands, effectively shrinking input lag created by human anatomy. It’s the same logic that led pro fighting-stick players to add macro buttons for throw techs—less motion equals faster execution.
Frame-Perfect Examples
In Super Smash Bros. Ultimate DX, binding jump to GR frees the right thumb for aerials, enabling tighter short-hop nairs. Speed-runners tackling Metroid Prime 4 can map GL to morph-ball for smoother bomb-jumps. These edge cases illustrate how remapping isn’t mere convenience—it’s a pathway to new techniques.
Smart Setups for Popular Genres
Not every game asks for the same reflexes, so here are genre-by-genre suggestions worth testing:
Put jump on GL and reload on GR. This keeps both thumbs rotating sticks—one for aim, one for movement—while the paddles handle vertical maneuvers and ammo management. The effect feels like swapping from manual to automatic transmission: smoother acceleration through every firefight.
GL = Jump, GR = Swim form. Because inkling swimming demands constant B-presses, shifting it rearward prevents thumb fatigue during intense turf wars, letting index fingers flick sub-weapons unhindered.
Assign drift (R) to GL and item use (A) to GR. You’ll drift, steer, and change items without juggling thumbs, which is vital on 200cc tracks where micro-adjustments rule.
Map dodge/roll to GL and lock-on to GR. Boss arenas become balletic when defensive moves live under your middle fingers.
Pro Tips to Avoid Common Pitfalls
First, resist the urge to mirror the same input on both paddles; you’ll waste potential. Second, beware accidental presses if you grip the controller tightly—consider lighter commands rather than critical ultimates. Third, remember to recalibrate finger placement each time you swap between handheld Joy-Con grips and the Pro Controller; muscle memory needs consistency to flourish.
Syncing Across Controllers: Joy-Con 2 Charging Grip vs Pro Controller
The Joy-Con 2 Charging Grip inherits GL and GR paddles, and the mapping interface is identical. However, profiles do not cross over: settings saved for the Pro Controller live on that device’s identifier. When we pick up the Charging Grip, we’ll need to run the Quick Menu once to copy layouts. It’s a minor chore, but it prevents confusion when multiple controllers pair to the same Switch 2.
Accessibility and Comfort: Tailoring Controls to You
For players with limited thumb mobility, the back buttons can relocate essential inputs to stronger fingers. Racing fans with arthritis, for example, often struggle to hold down face buttons for acceleration; mapping ZR throttle to GR creates a gentler perch for longer play sessions. The fact that every game stores its own layout means users can experiment without fear of ruining another genre’s comfort build. Remember: if GL/GR still feel awkward, the console’s default controller-wide remapping (found in system settings) remains available, layering yet another level of customization.
Looking Ahead: Firmware Updates and Future Possibilities
Nintendo has hinted that upcoming patches will allow sharing GL/GR layouts via QR codes, so speed-running communities can distribute optimal control schemes overnight. There’s even chatter of combo macros—pressing GL could trigger a rapid A-A-B string in brawlers—though Nintendo will likely gate that feature behind a tournament-legal toggle. Whatever arrives, the groundwork we lay now by mastering the Quick Menu ensures we’re ready the moment those updates drop.
Conclusion
Rear paddles might look like small pieces of plastic, yet they unlock a mountain of ergonomic and tactical benefits. By learning the Quick Menu’s two-tap dance and experimenting with genre-specific binds, we transform the Switch 2 Pro Controller from a familiar friend into a personalized powerhouse. The console remembers per-game preferences, our fingers stay on the sticks, and every title feels a little more intuitive. Map smart, play smarter, and let the GL and GR buttons carry you to new high scores.
FAQs
- Do I need to install an update before mapping GL/GR?
- No, the feature ships with the Switch 2’s launch firmware.
- Can I assign motion controls to GL or GR?
- Only digital button inputs are supported, so motion gestures aren’t available.
- Will my settings transfer if I replace my Pro Controller?
- Layouts are tied to the controller’s ID, so a new pad means fresh mappings.
- Can two users on the same console have different GL/GR layouts for one game?
- Yes, mappings save per user profile as well as per game.
- Is there a way to disable GL/GR entirely?
- In the same Quick Menu screen, choose “Clear Assignment” for each paddle.
Sources
- Setting The Switch 2 Pro Controller’s GL And GR Buttons Looks As Easy As Pie, NintendoLife, May 14 2025
- Here’s How You Can Map The GL/GR Buttons On Your Nintendo Switch 2 Pro Controller, NintendoSoup, May 15 2025
- Nintendo reveals that the Switch 2’s GL/G2 buttons are easily customizable, and can be mapped for any game in the console’s quick menu, TechRadar, May 15 2025
- Nintendo Switch 2 Adds Mid-Game Button Remapping for Pro Controller and Joy-Con Case, Here’s How It Works, The Game Post, May 14 2025



Yo this is actually super helpful! I never knew you could save different setups per game. Gonna map swim to GR in Splatoon tonight 🎮🔥
So basically they added buttons just so we can press other buttons… genius innovation 😂
Why even add buttons if I gotta memorize a guide just to use them? Nintendo overcomplicating again 🙄