


Summary:
Nintendo is updating its original Nintendo Switch Joy-Con controllers with a user-replaceable battery design for the European market. The revised controllers are being introduced as Nintendo prepares its hardware lineup for upcoming European Union battery requirements, which will make it easier for consumers to remove and replace portable batteries. Rather than requiring owners to send an ageing controller away for battery service, compatible Joy-Con models can be opened and fitted with a new battery by following Nintendo’s official instructions.
Nintendo of Europe has published separate procedures for the revised left and right Joy-Con. These instructions show how to remove the rear housing, lift the battery from its holder, disconnect the battery cables and secure a replacement using fresh double-sided tape. The company also plans to sell an official battery replacement kit through the Nintendo Store in Europe. The package will include the replacement battery and the tools needed for the job, including a screwdriver, plastic tweezers and a plastic spudger.
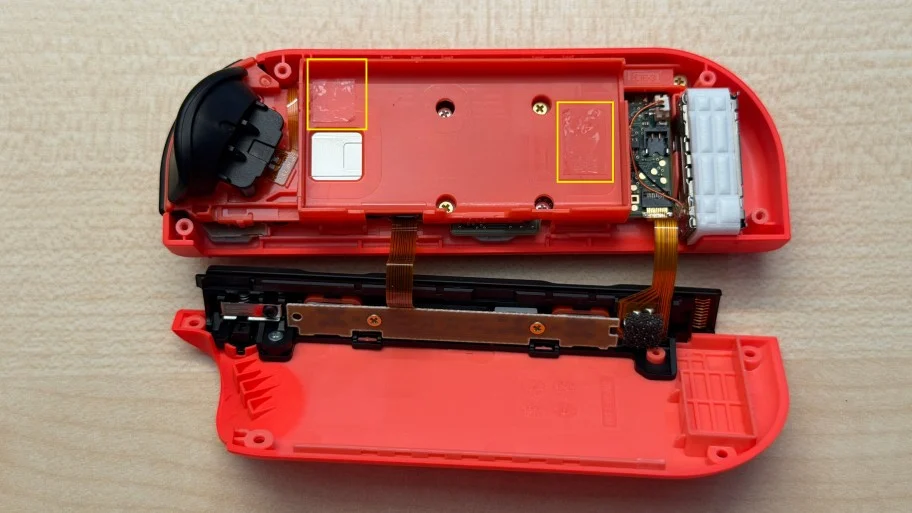
Only revised Joy-Con models support Nintendo’s user replacement procedure. The updated left controller carries the model number HAC-015(-01), while the right controller is marked HAC-016(-01). Existing HAC-015 and HAC-016 controllers are not classed as user-replaceable models. Nintendo’s newly published instructions also provide a useful look inside the redesigned controllers, revealing how the battery holder, adhesive strips, cables and internal components have been arranged to make battery servicing more approachable.
Nintendo Introduces Revised Joy-Con Controllers With Replaceable Batteries
Nintendo is preparing revised versions of its original Joy-Con controllers that allow owners to replace the rechargeable battery themselves. It may not be the sort of hardware announcement that arrives with dramatic music and a colourful trailer, but it could make a meaningful difference once a controller has spent several years surviving long gaming sessions, crowded travel bags and the occasional trip between sofa cushions. Batteries naturally lose capacity over time, so making them replaceable can help owners continue using otherwise functional controllers instead of replacing the entire device.
The revised Joy-Con retain the familiar design used with the original Nintendo Switch family. Their buttons, rail connections and general functionality remain unchanged, but the internal construction has been adjusted to support battery removal. Nintendo has also replaced the less common screws used on earlier versions with conventional cross-head screws. That small change makes the controller easier to open with the screwdriver supplied in Nintendo’s planned replacement kit.
Nintendo has published individual replacement instructions for both controller sides because the internal layouts are not identical. The left and right Joy-Con contain similar batteries and share many of the same replacement steps, but their cables and internal components are positioned differently. Owners therefore need to follow the procedure written specifically for the controller they are repairing rather than assuming both sides can be handled in exactly the same way.
European Battery Rules Are Changing Nintendo Hardware
The redesigned Joy-Con form part of Nintendo’s preparations for European Union rules covering the removability and replaceability of portable batteries. Article 11 of Regulation (EU) 2023/1542 establishes requirements intended to make batteries in many consumer products easier for end users to remove and replace. The relevant provisions are scheduled to apply from February 18, 2027, although manufacturers can revise products ahead of that deadline.
The purpose behind the change is fairly straightforward. A rechargeable battery is often one of the first parts of a portable electronic device to show its age, while the surrounding hardware may continue working perfectly well. When replacing that battery is difficult, expensive or restricted to specialist service centres, consumers may decide that buying an entirely new device is easier. That creates unnecessary electronic waste and can shorten the useful lifespan of products that still have plenty of life left in them.
For Nintendo, compliance involves more than simply placing a loose battery behind an access panel. The controller must be designed so the battery can be reached and replaced without damaging the product, and owners need appropriate instructions and safety information. Nintendo’s approach combines revised internal construction, identifiable model numbers, official repair procedures and dedicated replacement kits. It is a more controlled solution than asking owners to improvise with a random toolbox and hope for the best.
Revised Joy-Con Models Can Be Identified by Their Model Numbers
Not every original Nintendo Switch Joy-Con supports Nintendo’s new battery replacement procedure. Owners must first confirm that they have one of the revised models. Nintendo identifies the updated left controller as HAC-015(-01) and the updated right controller as HAC-016(-01). The older versions use the model numbers HAC-015 and HAC-016 without the additional “-01” designation.
The model number is printed on the rear of each controller near the rail. Checking this marking is the most reliable way to determine which version you own. Nintendo also notes that the revised model numbers appear in the contents section on compatible Joy-Con packaging. This should make it easier to distinguish the updated controllers when buying a new pair or an individual replacement from a retailer.
There is also a visible difference in the screws securing the rear housing. Revised controllers with user-replaceable batteries use Phillips cross-head screws, while older versions use Y-shaped screw heads. That distinction provides a quick visual clue, although checking the printed model number remains the safer approach. Nobody wants to begin a repair only to discover halfway through that the controller on the table belongs to the wrong hardware revision.
Left and Right Joy-Con Receive Separate Updated Designs
The revised left and right Joy-Con use the same HAC-006(-01) replacement battery, but their internal layouts require separate instructions. In the left Joy-Con, the replacement procedure includes opening the rear housing, lifting the battery from its holder, disconnecting the battery cables and installing the new unit before reconnecting it near the end of the process. The right Joy-Con follows a similar sequence but includes an additional check involving the antenna and its cable.
These differences are important because the controllers contain delicate ribbon cables, circuit boards and connectors. Treating them as interchangeable could lead to a pinched cable or an incorrectly routed wire. Nintendo repeatedly warns owners not to insert tools too deeply into the casing and not to disconnect the flat cables joining the rear housing to the main circuit board.
The separate procedures may appear slightly fussy, but they reduce ambiguity. Each set of instructions reflects the exact controller being opened, including the correct battery orientation and cable position. That level of detail is useful for anyone who has never worked inside a small electronic device before. A Joy-Con is compact, and its components are packed together like passengers on a very busy train.
Phillips Screws Make the New Housing Easier to Open
One of the most practical changes is Nintendo’s use of four Phillips screws to secure the rear housing. Earlier Joy-Con models use Y-head screws, which generally require a less common screwdriver. By moving to conventional cross-head screws, Nintendo makes the revised controller more approachable for end users and aligns the design with the tools included in the official replacement kit.
The screws still need to be handled carefully. Their small size means they can be misplaced easily, and excessive pressure could damage the heads or surrounding plastic. Nintendo instructs owners to remove all four screws before using the plastic tools to separate the rear housing from the front section. Once opened, the housing remains connected to the circuit board by two flat cables, so it cannot simply be pulled away and placed to one side.
This is where patience matters more than enthusiasm. Opening the shell gently helps protect the internal hooks and cables, while keeping the controller face down prevents parts from shifting unnecessarily. The procedure is designed for ordinary owners, but it still involves real electronic hardware rather than a toy building set. Slow, deliberate movements are the sensible choice.
Nintendo Will Sell an Official Joy-Con Battery Replacement Kit
Nintendo plans to offer an official battery replacement kit through the Nintendo Store in Europe. The company has not yet provided a firm sales date or price, but its support pages state that the required products will become available in the future. Each kit is intended to provide the parts and tools needed to complete the replacement without asking owners to source compatible pieces separately.
The package will contain a new HAC-006(-01) battery, a suitable screwdriver, plastic tweezers, a plastic spudger and replacement double-sided tape. The tape matters because the battery is secured inside its holder by adhesive strips. Once the old battery has been removed, its original adhesive should not be reused. Fresh strips keep the replacement battery from moving inside the controller during normal play.
Providing plastic tools is also a deliberate safety choice. Metal tweezers or sharp tools could scratch components, bridge electrical contacts or damage cables if they slip. Plastic accessories reduce those risks, although they do not eliminate the need for care. Nintendo’s kit should also remove much of the uncertainty surrounding battery compatibility, connector design and adhesive placement.
The official approach may appeal to owners who are comfortable carrying out a simple repair but do not want to gamble on unverified third-party parts. They will know the battery was designed for the revised Joy-Con and that the supplied tools match Nintendo’s instructions.
The Replacement Process Requires Careful Disassembly
Replacing the battery begins by removing the four screws from the rear housing. Nintendo then instructs owners to use the handle of the plastic tweezers or the supplied spudger to separate the casing carefully. The tool should enter the seam near the bottom edge before being moved gradually along the curved outside edge. Internal hooks release as the two sections separate.
Once the housing is open, the controller must remain face down. The rear shell is still attached by flat cables, and Nintendo specifically warns users not to disconnect them. The battery sits inside a dedicated holder and is secured by two pieces of double-sided tape. Owners can use the handle of the tweezers to lift the battery gently through a cut-out in the side of the holder.
After the adhesive releases, the battery cables can be disconnected from the circuit board. Nintendo advises grasping both cables together and pulling upward from the connector without pinching it. The old adhesive strips must then be removed completely before new tape is placed inside the holder.
The replacement battery is pressed onto the fresh adhesive in the correct orientation, but its cable is not connected immediately. Nintendo leaves that step until the surrounding components and cable routes have been checked. This sequence helps avoid unnecessary electrical current while the controller remains partially disassembled.
Nintendo’s Instructions Emphasise Cable Position and Battery Orientation
Correct cable routing is one of the most important parts of the replacement. In the revised left Joy-Con, the red battery cable must face toward the battery when the connector is attached. In the right Joy-Con, the red cable faces away from the battery. The right controller also requires owners to confirm that its antenna cable sits within the appropriate guides and is not trapped beneath the battery holder.
These details may sound minor, but small positioning errors can prevent the housing from closing correctly or place pressure on fragile wires. Before replacing the rear shell, the battery cable must be tucked into the available space between the battery and the rumble motor. Nintendo warns that it should not become pinched as the housing is closed.
After the four screws have been reinstalled, owners should check that every button moves normally. Nintendo also suggests gently shaking the controller to confirm that nothing is loose or rattling inside. A mysterious rattle is rarely the victory sound anyone hopes to hear after finishing a hardware repair.
Nintendo’s Instructions Reveal the Revised Joy-Con Interior
The newly published procedures offer a close look at how Nintendo modified the interior of the original Joy-Con. The general arrangement remains familiar, with the battery positioned above other components inside a moulded holder. However, the updated construction has clearly been planned around removal, adhesive replacement and safe reconnection by the owner.
The battery holder includes a cut-out that provides space for a plastic tool to lift the battery. Fresh adhesive can be placed within defined areas of the holder, while the replacement battery’s cable fits through a dedicated notch. These details help guide the owner through the process and reduce the amount of force needed to free the old battery.
Nintendo’s images and videos also illustrate how little spare room exists inside each controller. The battery, rumble motor, circuit boards, antenna components and wiring sit within a slim plastic body. That compact layout explains why the company’s instructions repeatedly focus on tool depth, cable routing and battery orientation.
The revised design does not turn the Joy-Con into something that can be opened casually during a lunch break. It does, however, make a battery replacement realistic for owners who follow the official steps and handle the components responsibly.
Replaceable Batteries Could Extend the Life of Joy-Con Controllers
A rechargeable battery gradually holds less energy as it ages. The controller may still work perfectly, but its wireless play time can become noticeably shorter. With older Joy-Con models, Nintendo does not classify the internal battery as user-replaceable. Owners may rely on professional repair services or consider purchasing another controller when battery performance becomes inconvenient.
The revised design gives compatible Joy-Con a clearer path to a longer service life. Instead of discarding the whole controller, owners can replace the ageing battery and continue using the buttons, rail, wireless hardware and other components already in their possession. That is good news for players and potentially good news for the environment, since extending a device’s useful lifespan can reduce avoidable electronic waste.
There are practical financial benefits as well. A replacement battery kit should cost less than an entirely new pair of Joy-Con, although Nintendo has not yet announced official pricing. Families with several controllers could find the option particularly useful after years of regular multiplayer sessions.
Battery replacement will not solve unrelated Joy-Con problems such as worn control sticks, damaged buttons or connectivity faults. Even so, it addresses one predictable form of hardware ageing and gives owners greater control over maintenance.
Revised Joy-Con Availability Is Currently Focused on Europe
Nintendo’s revised Joy-Con models and battery replacement kits are currently associated with its European hardware plans. The company’s regional support materials explain how European customers can identify compatible controllers and state that replacement kits will be sold through the Nintendo Store in Europe. Nintendo has not confirmed an equivalent rollout for other markets.
Availability may also differ by country, retailer and controller colour as the revised products are introduced. Nintendo says different colours will become available at different points throughout the year, with the transition beginning on July 16, 2026. Shoppers looking specifically for a user-replaceable version should check the packaging for the HAC-015(-01) or HAC-016(-01) model number rather than assuming every new Joy-Con on a shelf uses the revised design.
The European release could still influence Nintendo hardware elsewhere. Manufacturers sometimes adopt a regulatory design change more broadly when maintaining separate regional versions becomes inconvenient. For now, however, any wider release would be speculation. Nintendo has only detailed these replacement procedures and kits through its European support channels.
What is certain is that Joy-Con maintenance is becoming more accessible for European owners. A fading battery will no longer have to mark the end of a revised controller’s useful life, provided the owner has the proper kit, the correct model and a steady pair of hands.
Conclusion
Nintendo’s revised Joy-Con controllers introduce a practical change that should become increasingly valuable as the hardware ages. The HAC-015(-01) left Joy-Con and HAC-016(-01) right Joy-Con feature user-replaceable batteries, conventional Phillips screws and internal layouts supported by official step-by-step instructions. Nintendo also plans to sell dedicated replacement kits containing a compatible battery, screwdriver, plastic tools and fresh adhesive.
The change is connected to upcoming European Union battery requirements and is currently focused on the European market. Although the replacement procedure still demands patience and careful handling, it gives owners a realistic way to restore battery performance without replacing an otherwise functional controller. That may not be as exciting as a surprise game announcement, but years from now, when a trusted Joy-Con starts running out of power before the evening is over, it could be exactly the update players appreciate most.
FAQs
- Which Joy-Con models have user-replaceable batteries?
- The revised left Joy-Con is identified as HAC-015(-01), while the revised right Joy-Con is HAC-016(-01). Older HAC-015 and HAC-016 controllers are not covered by Nintendo’s user replacement procedures.
- What is included in Nintendo’s Joy-Con battery replacement kit?
- The planned kit includes a replacement HAC-006(-01) battery, a screwdriver, plastic tweezers, a plastic spudger and double-sided tape for securing the new battery.
- Can the same battery be used in the left and right Joy-Con?
- Yes. Nintendo’s instructions identify the HAC-006(-01) battery for both revised controllers, although owners must follow the separate procedure for the correct controller side.
- How can I identify a revised Joy-Con without opening it?
- Check the model number printed on the rear of the controller near the rail. Revised controllers also use Phillips cross-head screws rather than the Y-head screws found on older models.
- Will the revised Joy-Con be released outside Europe?
- Nintendo has only detailed the revised controllers and replacement kits for Europe. A release in other regions has not been confirmed.
Sources
- Joy-Con (L) (HAC-015(-01)) Battery Replacement Procedure, Nintendo, July 2026
- Joy-Con (R) (HAC-016(-01)) Battery Replacement Procedure, Nintendo, July 2026
- How to Identify Whether Your Joy-Con Contains a User-Replaceable Battery, Nintendo, July 2026
- Information About Upcoming Battery-Related Revisions to Some Nintendo Products, Nintendo, July 2026
- Nintendo of Europe Posts Articles Showing How to Swap Joy-Con Batteries in New Controller Designs, Nintendo Wire, July 16, 2026